Students Using Collaboration ToolsCollaboration tools are tools that can be used by bringing others together to create something new. That something new can be anything from a web document, to a picture, to a presentation. There are types of collaboration tools that can be used by all student age groups from anywhere that has technology with internet. Collaboration tools are found everywhere all over the internet; all you have to do is look them up and sign up for them. They are tools at which you are able to share the information with others and be able to work on it together simultaneously or at different times. So what students can do to use these tools is that they first off need a technology tool, such as a computer, laptop, smartphone, or tablet. This way, they are able to access the material. Next, they need internet because these types of tools involve sharing with others, meaning internet is needed. Next, students need to have emails and passwords in order to log on and off of their tools. After that is all established, students will now have to find tools that they like and want to use. If other use the same type of tool, then you can share your information with them and vise versa by adding usernames or emails into the “share” list. It is all very easy and a fun way of learning for the students.
List of Online Collaboration ToolsTool #1-Google Drive
Google Drive- There is also a way to download Google Drive onto a Smartphone or Tablet by Downloading Drive Here: This is one of my favorite tools because it is helpful in so many ways. You log into it and it saves all of your writing, meaning you can access it from any computer with internet. It automatically saves periodically, so if your device were to malfunction and shut down, your information would not be lost. Also, if gives you the ability to share your information with others, where they can either just have the ability to look at the information or they are also able to edit the information. This is a great way to have students collaborate on projects because they can each work on the project on their own time without having to all be in the same place. Students can use this tools to do their essays or assignments so the information can go from the computer at school to one at home or the library, can be used for projects so students can each work on it, and also can be used for students and teachers to share information back and forth. This is a great tool and I use it all of the time. I would highly recommend this tool for students.
|
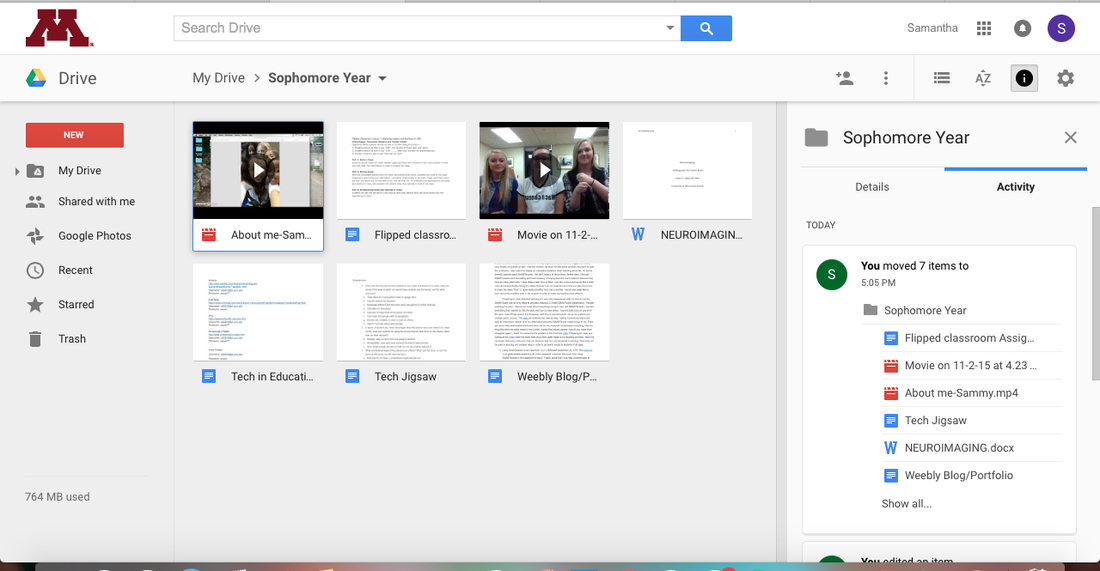
Here is an example of my Google Drive. Here you can see I have My Drive and also different folders. The folder I was in was "Sophomore Year". In this folder is all of my documents from that year. You can see that I have videos, documents, and you can also have powerpoint. You can add new documents, see which documents have been shared with you, and also see recent activity. You can also share your documents and information with others. This is a very helpful tool and keeps things very organized.
|
|
Tool #2- VoiceThread

VoiceThread-There is also a way to download VoiceThread onto a Smartphone or Tablet by Downloading VoiceThread Here: This is an awesome tool for students to be able to give feedback, show their understanding, and be able to see what their classmates were thinking. This is a tool where you can take a snapshot of something and have people respond to it. They are able to respond through audio, video and audio, text, or being able to draw right onto the screen. This is a great took for students to be able to give feedback on other’s work and learn through what others say. So let's say that students were doing an art project and they were to take a picture of their finished work to post to VoiceThread. Students can then go onto that student’s page, look at his/he work, and leave comments about what they see and what they like about it. This tool is a great way to get students to communicate to each other and to get feedback about their material. This is a good way for students to interact with each other and each other’s work. Also, this tool can be used with others by sharing it so others can work on it as well.
|
VoiceThreadHere is an example of the VoiceThread we did in class. We were to put "where was your favorite place in Duluth" here on the picture of the map. I opened up my comment so you can see that you are able to see all of the comments, which are in order of completion and also have the initials of the people's names on it to let you know whose comment is whose. I did a text response to show where my favorite place was, but others did video responses and others did audio responses. This is a great tool to get everyone's work on one page where everyone can see everyone else responses.
|
|
Tool #3- ThingLink
ThingLink- There is also a way to download Thinglink onto a Smartphone or Tablet by Downloading ThingLink Here: This is a truly amazing tool that allows students to become more creative with their work and be able to show it to others. This tool is a way to “make your images come to life”, where you can take a snap shot and add information to different parts of it. For example, you can add another photo, a video, a lecture, a link, and so on. For example, if you have a picture of a cell, you could click on the nucleus of a cell and have a video pop up talking about it or click on the mitochondria of the cell and it show a little animation about it. This is a great tool for students to learn because it can give them a creative output where they can show what they learn to the teacher as well to the rest of the class. This is something that multiple people can work on by sharing it with others. This gives students the ability to learn and work with others to make something that shows their learning. This is a great tool for students to use in order to collaborate with each other.
|
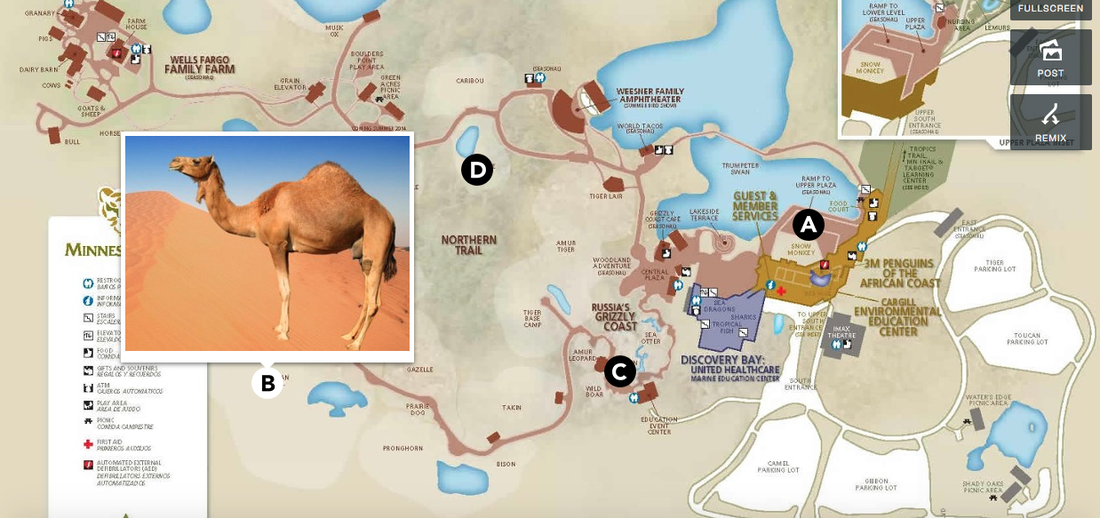
ThingLinkHere is an example of the ThingLink my group and I created during class. So what we did was take a picture of a map of the Minnesota State Zoo and uploaded it into ThingLink. Then we labeled different areas "A", "B", "C", and "D". each of these places are different animals from different countries. So what we did was for each of the areas, we posted a picture of what the animal actually looks like. So when someone hovers over the label, the picture will pop up. For example, the label "C" was over the area of the camel exhibit, so when I hovered over it, a camel popped up. This is a great took to dip into their creativity and also to help get the children to work together.
|
